 Catan Trainer
Catan Starting Placement: How to Choose Your First Two Settlements
Most Catan games are decided in the first two minutes, before a die is rolled. You get two settlements and two roads, and the fifty-odd legal corners in front of you are not remotely equal. This is the step-by-step method strong players use for the initial placement: how the draft works, what to count, how to read the board, how to value ports without fooling yourself, and how to make the second settlement finish the job the first one started.
First, how the placement round actually works
Catan's setup is a snake draft. In turn order each player places one settlement and one road; then the order reverses and everyone places a second settlement and road. With four players that means the first player places 1st and 8th, the second 2nd and 7th, the third 3rd and 6th, and the fourth player places 4th and 5th, back to back. Three rules shape everything that follows:
- The distance rule. No settlement may be placed on a corner adjacent to another settlement. Every placement removes its own corner and the corners next to it from the board, for everyone.
- Your starting hand comes from the second settlement only. You receive one resource card for each hex touching the settlement you place second. Which of your two spots you place second is a real decision.
- Ports need a settlement on them. A harbor's trade rate is only yours once one of your settlements sits on one of its two coastal corners.
Seat matters. Placing first you get the best corner on the board and the leftovers on the way back; placing fourth you get two mediocre-to-good corners in a row, chosen together with full information. Neither is strictly better, but they demand different plans, and the cheat sheet at the end covers each seat.
Step 1: Rank every open corner by pips
The dots under each number token show how many of the 36 two-dice combinations roll it: one on the 2 and 12, five on the 6 and 8. Add the dots of the hexes touching a corner and you have its production per 36 rolls. Do this for every legal corner before you think about anything else.
On most boards the strong first placements sit at 10 to 13 pips. Ten is the floor to expect; 12 or 13 is elite, and since the red 6 and 8 are kept apart in the standard setup a corner touching both is rare. Starting from the top of the pip ranking is the single habit that separates casual placement from competitive placement. Casual players scan for resources they like; strong players find the highest-producing corners first and only then ask what they are made of. If you want the odds behind the dots, our Catan dice probability guide has the full chart.
Step 2: Read the board's supply
A hex is not worth its pips alone; it is worth its pips relative to how much of that resource exists on this board. Total the pips behind each of the five resources across all 19 hexes. Then count how many corners give real access to each one (a corner touching that resource with 6 or more total pips is a workable spot for it).
When a valuable resource is thin, the corners that produce it well are expiring assets. If ore is three hexes on a 3, a 5 and an 11, the corner on the 5 ore is the only real ore on the board and it will not be there for your second pick. Champions take scarce-and-valuable now and collect the plentiful resource later; the 2025 World Championship final was decided partly by who claimed the board's only good ore with the very first placement. When a resource is abundant, its pips are worth a little less: everyone will have it, nobody will trade for it, and the robber will not bother blocking it.
Step 3: Pick a plan the pips support
Ten points usually needs largest army or longest road on top of your buildings, and the two roads to those bonuses run on different resources:
- Ore, wheat and sheep build cities (three ore, two wheat) and development cards (one each of ore, wheat, sheep). Cities double production and development cards win largest army. This is the "OWS" game, and a strong version of it is the most reliable way to win.
- Wood and brick build roads (one each) and, with wheat and sheep, settlements. This is the road game: expand fast, take longest road, spread over five settlements.
- Hybrids take the core of one plan plus one hex of the other so you self-produce a resource you would otherwise have to trade for. Ore, wheat and sheep with a single wood or brick hex is the most common expert opening.
- Five resources is only a plan at very high production. A low-pip corner that touches everything is the most seductive trap on the board: it looks flexible and it is slow at everything.
You highly prefer three resources on a first placement. The exception is a very strong two-resource corner of exactly wheat and ore, the pure city engine. As a tiebreaker between close spots, most competitive players weight the resources roughly wheat, ore, brick, wood, then sheep, and then adjust for what this board is short of. A first settlement with real production of both wheat and ore has set its plan; one with wood and brick has set the other; a first settlement with wheat, wood and sheep has committed to nothing yet, and that is fine as long as the second settlement commits.
Step 4: Value ports by the roads you still have to build
This is where most placement advice is wrong, including advice from good players. A harbor does nothing until one of your settlements sits on one of its two corners. Now apply the distance rule: the port corner directly next to your new settlement can never be settled by anyone, including you. So from a fresh settlement the closest port corner you could ever build on is two roads away, and then a settlement. "One road from the port" is not a thing on a first placement; the only port that is one road out is one your placement road already points at, and even that needs another road and a settlement before it trades for you.
Price ports accordingly. A port your settlement sits on is an asset today. A port two roads away is a plan you might execute by mid-game, worth something, but not worth giving up two pips for. And a 2:1 port trades away the resource on its sign, so it is only as valuable as the surplus of that resource you will actually produce: an ore port next to eight pips of your ore is a production multiplier; the same port next to a corner that makes no ore is a signpost. A 3:1 port is the safe version: useful for any surplus, never spectacular. A position that ends up with one 3:1, or one 2:1 it can feed heavily, has a port game. Anything less is decoration.
Step 5: Map your outs before you commit
Your first pick is a package deal with the second pick it leaves you. Before you place, project the draft: which corners will the players after you take with their first placements, and which will the players who place their second settlement before you take with theirs? Placing first, seven placements happen before you pick again; the top of your pip ranking will be gone. Placing fourth, nothing happens between your two picks and you can plan them as a pair.
Then check that the spots left to you still work with your first pick. The disaster case is a position that cannot get wheat from either settlement, because everything you build needs it. If the flashy first pick leaves you choosing among wheat-less scraps on the way back, a slightly weaker first pick with protected outs wins the opening. Championship players describe this as knowing your outs before the first settlement goes down, and it is the step most club players skip entirely.
Step 6: Make the second settlement complete the first
Judge every second-settlement candidate on the combined position, never on the corner alone. Add the two settlements' pips per resource and ask five questions:
- Does it stay on plan? A wheat-and-ore first settlement wants more wheat, ore and sheep, or an elite port for one of them. A wood-and-brick first settlement wants the pair completed or deepened. A second spot that adds a lone road resource to a city position, or a lone city resource to a road position, is "adding a resource" you cannot build with.
- Are the pair resources paired? Brick without wood, or wood without brick, across both settlements and with no port to convert it is mostly dead production. Never take a spot because it "adds brick" when nothing in your position makes wood.
- What is the starting hand? The settlement you place second deals one card per adjacent hex. Wood plus brick there is a road in hand on turn one, a real tempo edge: you claim your expansion corridor before anyone rolls. Ore, wheat and sheep there is a development card. Three cards you cannot spend for several turns are worth little, so when you hold the right pair of spots, place second the one whose cards you can use.
- How many distinct numbers do you cover? Count the different numbers across both settlements. Three is a serious weakness, four is a downside, five or six is healthy. The one good duplicate is wheat and ore sharing a number, because that roll builds a city.
- Are you crowding yourself? A second settlement at the minimum legal distance from your first eats the corridor your first road was going to expand into and usually stacks the same hexes. It has to be exceptional on its own to be right.
One or two pips of a resource across both settlements is still token production. "It gets me ore" is not a reason when the ore is a lone 3.
Step 7: Point the road at something you can claim
The road you place with each settlement is a free first step, and it is the only free one you get. Aim it at a corner you could settle in one or two more roads that brings a resource your position lacks, or at a port you can feed, and prefer the direction where nobody else's road is heading. Roads pointed inward toward the crowd get blocked; roads pointed toward the coast or an open stretch usually do not. Before you commit, run the draft forward once more: is the corner you are pointing at likely to still be open after the remaining placements? A road aimed at a contested corner is a bet on your opponents' cooperation. Make that bet on purpose or not at all.
Seat-by-seat cheat sheet
| Seat | Places | What to optimize |
|---|---|---|
| 1st | 1st and 8th | Take the best corner on the board, but only after confirming your outs: seven placements happen before you pick again, so make sure a wheat source survives for you. Your second pick will be a two-hex coastal spot more often than you would like; choose a first pick that still works with that. |
| 2nd | 2nd and 7th | Usually the second-best corner, with a real chance to shape the plan around what the first player left. Watch for the scarce resource the first pick did not take. |
| 3rd | 3rd and 6th | The most balanced seat: good information on the first two picks and only two placements between your own. Often the seat where a strong two-resource wheat-and-ore corner is still available. |
| 4th | 4th and 5th | You are choosing a pair, not a corner. Pick the two spots that together cover wheat, real ore or a complete road pair, and a port plan, then order them for the starting hand: the spot whose cards you can spend on turn one goes second. Nobody can take your partner spot in between, so "lock it first" is never a reason. |
The mistakes to avoid
- Falling for a low-pip five-resource corner. Flexible-looking and slow at everything.
- Crediting a 2:1 port for a resource you do not produce. The port trades that resource away.
- Calling a port "one road away." From a fresh settlement it is two roads and a settlement; the adjacent corner can never be built on.
- Building toward a corner you do not control without deciding that the bet is worth it.
- Drifting plans. Two half-plans lose to one whole plan.
- Skipping the outs check and discovering on pick two that nothing left makes wheat.
Each of these has cost a national champion a final; we collected six of them from championship film.
The checklist
- Rank every open corner by pips. Start from the top; expect 10 or more.
- Total the board's pips per resource. Scarce and valuable is now-or-never.
- Choose the plan your strongest numbers support: city engine, road game, or a hybrid. Prefer three resources, except elite wheat plus ore.
- Count ports as roads still to build. Only a port you sit on is an asset; a 2:1 is worth the surplus behind it.
- Project the draft and confirm your outs, especially for wheat.
- Judge the second settlement on the combined position: plan, paired resources, starting hand, distinct numbers, no self-crowding.
- Point each road at a corner or port you can realistically claim.
Run the checklist on fifty boards tonight
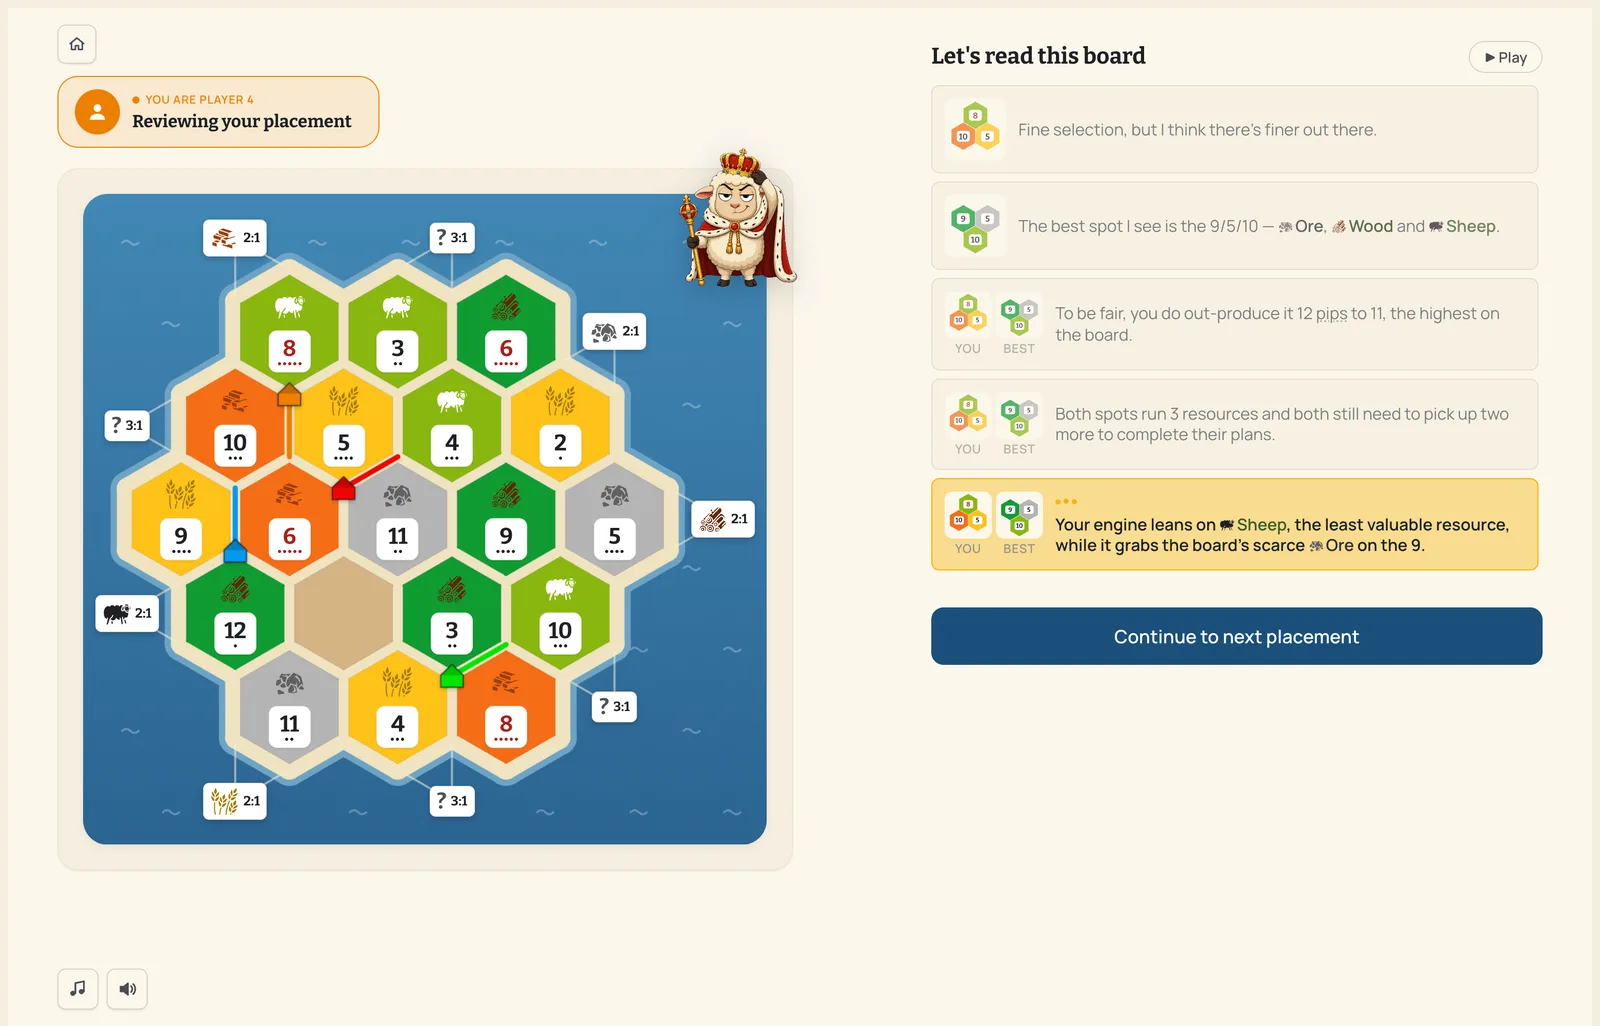
Catan Trainer deals you a board, you place, and an AI coach shows you the best available spot and argues the difference in plain English: pips, scarcity, plan, ports, outs. Free to try, no setup.
Train your placements →